|
|
 |
 |
|
 |
Home
:: Users' Guide |
 |
 |
 |
|
|
Users' Guide - A detail manual book
|
|
 |
 |
 |
-
Installation:
Requirements:
VRScilab works with whatever machine that has
Scilab 2.6 running; it has no particular hardware
requirements.VRScilab works perfectly on our computers.
I think your machine should be suit to run it.
VRScilab 1.0 is for Scilab 2.6. So you certainly
need a copy of Scilab. VRScilab runs on both Windows
and Linux. You will need Tcl/Tk if you want to
run VRScilab on a Linux system. Usually it’s
installed with Scilab. If it is not, try getting
one from www.sourceforge.com. VRScilab works with
Tcl/TK 8.0, 8.2 and 8.3.
For Windows users:
Run setup.exe, and follow screen
instructions.
For Linux users:
Unzip and untar the package, then run the script
setup.shar. This script does nothing more than
copies all the files of the software pack into
where Scilab residents. So you can do it manually
if anything goes wrong. Here is the command you
will need:
$gunzip –c VRScilab.tar.gz | tar
–xvf –
(This extracts all files from package to working
directory)
If you wish to run setup script, type
$VRScilab/setup.shar
If you want to copy it manually, do this
$cp –R VRScilab <your Scilab
directory>
and then create a script file VRScilab.sci,
with following one line:
TK_EvalFile(‘<your Scilab directory>/VRScilab/main.tcl’);
Put it anywhere you like. You will need
to run this script in Scilab to launch VRScilab.
- Getting Started:
Read the User Guide that comes within the software
pack. Don’t spend too much time on Scilab
itself. Try to focus on Scilab. The aim of VRScilab
is to export the picture of the result to .wrl file(VRML),which
is much better than all types of file in Scilab
itself.
- Interface Illustration:
VRScilab Main Window:
VRScilab has a main window like this:

You may be familiar with the most of the buttons,
don't you?
Now,let's learn the functions of the RUN
and SPEED.
Run:
1.Try in Scilab:Scilab can run the file
in itself,and export the result in its window.

2.Export to VRML:VRScilab can run the file.Then
you can set the effects of the objects and the environment.At
last,VRScilab can export the picture in your browser.(In
the .wrl file,you can look at the 3D graph at any
angle and at any distance)
Speed:
Speed up:This tool can settle the antinomy
between Tcl and Scialb.
- How to use the VRScialb:
1.Write the code in the Code window(if you can't
input the letter into the Code window, then press
the 'speed up'.)
2.Then,if you want to run the code in Scilab,press
the button'Try in Scilab'. Howerer, if you want
to export the picture of the result to VRML, press
the button'Exports to VRML'. If you press
the button 'Exports to VRML', now,
follow me.
3.If you press 'Exports to VRML',
the 'VRML object Settings' window.
Now, the VRScilab will show
this window to you.

i. The fram 'Attention'
on top of the window shows you the messages of the
object you make,such as the number of the object
in this file and so on.
ii. The fram 'User
Guide' on left of the window shows you
the messages of the functions of the buttons in
this window.
iii. Press the button 'Object
Color', you can choose the color of this
object from the color choosing dialog. And when
press the button 'Specular Color',
you can choose the color of the refraction light.
iv. Control scroll bars you
can choose the ambient intensity, shininess and
transparency.
v. If you select 'Use
a picture as texture', you can choose the
picture out of the object from you computer.
vi. Control 'Crease
angle' scroll bars you can choose the smoothness
of the object.
Now here are some properties of other buttons:
i. If you press 'Default',
the object will be the effect we give you.
ii. If the effect is ready,
press 'OK'.
iii. If you want to apply
the effect to all object, press 'OK to all'.
iv. If you want to give up
the object, press 'Cancel'.
v. If you don't want to output
the picture, press 'Cancel to All'.
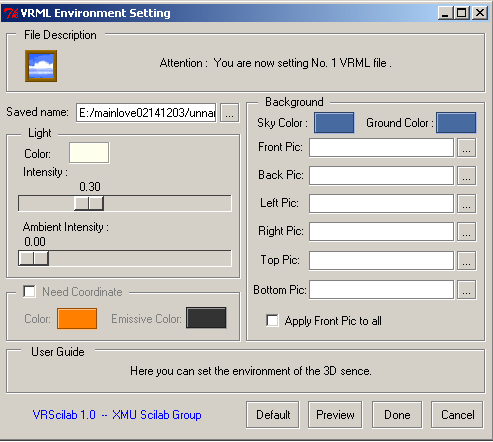
After you define the objects, the window of 'VRML
Environment Setting' will appear.

Now,let me show the buttons:
i. The fram 'File
Description' on top of the window shows
you the messages of the enviroment you make.
ii. You can select the
path and the name of this file.
iii. In the fram 'Light'
you can choose the color of the light through pressing
the button. And you can control the intensity and
ambient intensity of the light.
iv. If you select 'Need
Coordinate', it will be coordinate axis
in the picture, and you can choose the colors of
the axis and emissives.
v. In the fram 'Backgroud',
you can choose the color of the sky and the ground.
And you can choose the pictures around the objects,
if you select 'Apply Front Pic to all',
all sides of the object will be the same of the
front picture.
vi. If you press 'Preview',
you will see the VRML picture in you browser.
vii. If you press 'Done',
the .wrl file can be saved in your machine.
viii.If you press 'Cancel',the
.wrl file will not be made.
After you press 'Done',the 'Report'
window will appear to tell you the summarize of
this

file. If you want to save the report, press 'Save
report', if not, press 'OK'.
Now, you can find the VRML file(s) where you put
them in some directory.
|
 |
 |
 |
|
|
|